User Management
Getting Started
You can create a new user by clicking on the User icon on the Dashboard and then on the Create New User Profile button.
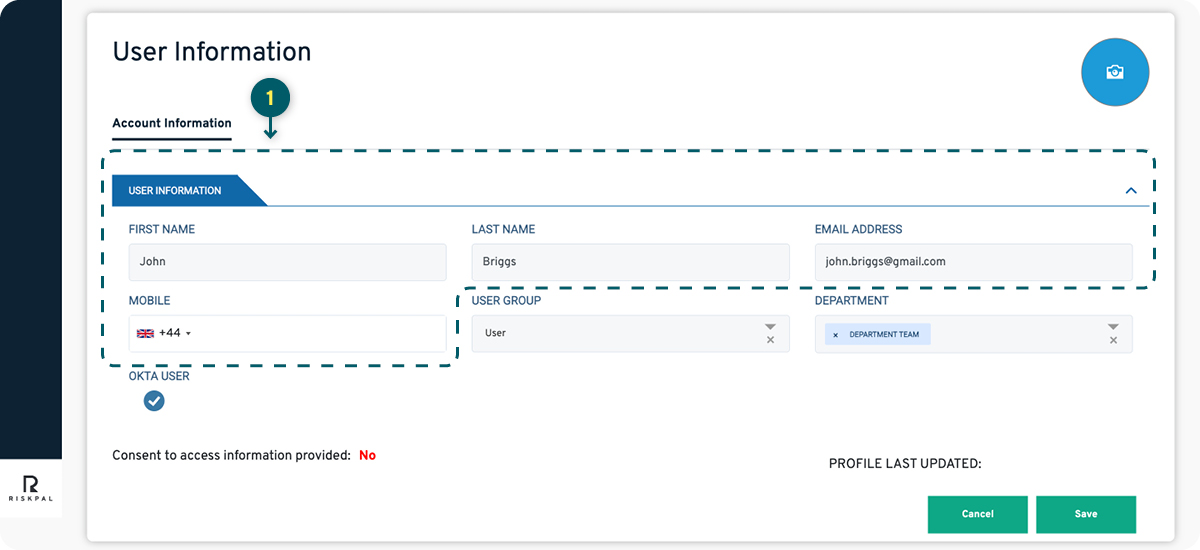
1. When creating a new user, you must add in their name, email and mobile phone number, ensuring you have selected the correct country code. It might not be necessary to provide phone number details if your organisations’ access is via Single Sign On (SSO).
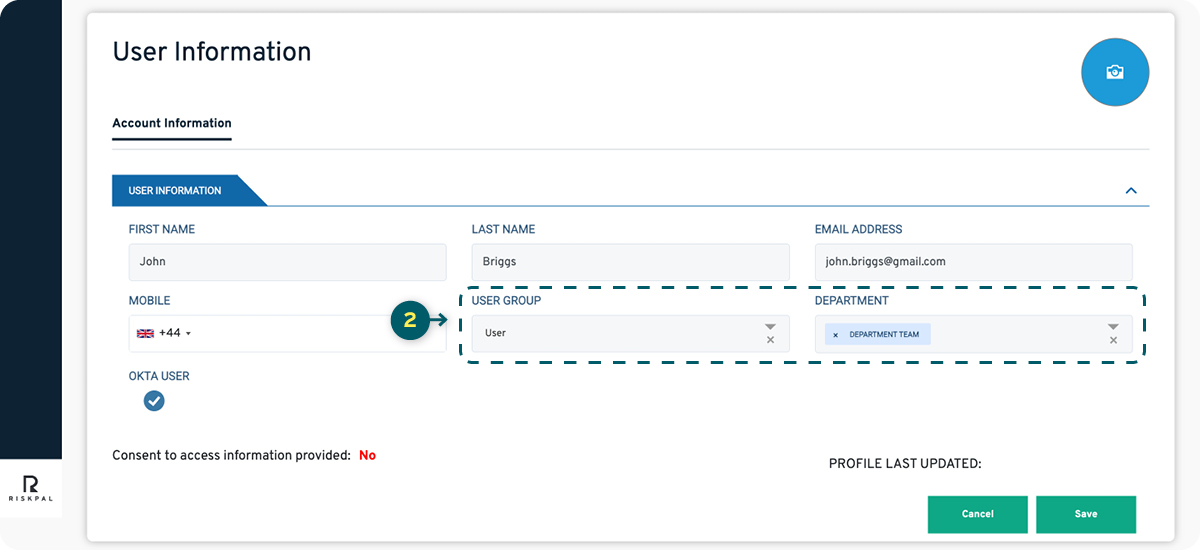
2. Assign a user group and department/s. Select from a series of default or organisation-specific user groups and assign the user to, at least, one department and select Save.


If the User is created with a 2-factor authentication account, they will receive an automatic email with instructions to finalise setup. For accounts created as SSO (Single-sign on), the notification email is optional.
Account Reminders & User Activity
1. If you have a 2FA set up and the new account holder reports not receiving the notification email, the User status will appear as Not Verified and you can click on the Re-send Email icon from the user list. All other SSO options will automatically make the Users active.
2. By selecting the drop-down, you can view the account creation history and last user login.


Editing Users
1. You can edit any user by clicking on the Edit icon on the list.
You can make changes to all fields except the email address field. A user email is the one identity marker that cannot be altered.
If a user email address has to be changed – either because the email address is incorrect, or the user changed their email address, a new RiskPal account linked to the new email address must be set up. The old RiskPal account has to be deactivated and the user will no longer have access to any information or risk assessments linked to the old account.

Deactivating Users
1. You can deactivate a user by clicking on the Deactivate icon.
2. You can reactivate an account at any given time by clicking on the Activate icon.
If you want to anonymise the account, for example following a right to erasure request, please contact RiskPal.
Anonymisation is not reversible.


User Status
Not Verified: The user has not clicked on password activation email to set up their account.
Not Activated: The account has been setup and the password created but the person has not signed in to RiskPal. If the user has forgotten the password you can either instruct them to reset their password by clicking ‘Forgot your password?’ in the Login page, or Re-send an email in the same way as with the Not Verified accounts.
Active: The account has been successfully set up and the user has logged in.
Deactivated: The account has been deactivated and the user cannot access RiskPal.
Anonymised: All user information has been anonymised and the account cannot be reactivated.
User Groups
Users need to be assigned to groups, which determine their permissions and level of access to the system.
There are three default user groups in RiskPal:
System Admin: Super Users that have access to all functions and customisation, as well as user management.
Manager: Users that also have approval permissions and, depending on configuration, can also have an overview of all risk assessments created in their designated department/s.
Users: General users with risk assessment creation rights.
Bespoke User Groups: If needed, you can create your own User Groups. Speak to RiskPal if you require these permissions.
You can only edit groups created specifically for your organisation. Default user groups created by RiskPal cannot be edited.
User Bulk Upload
If you want to bulk upload multiple users, speak to your RiskPal administrator. They will provide you with a .csv file to complete, detailing key account information such as names, email addresses, phone numbers, user group and departmental membership.

